You can change the Rift Display Mode in the "Oculus Configuration Utility". Select "Tools" in the menubar and then "Rift Display Mode...".
Direct HMD Access from Apps (Direct to Rift)
This display mode is for "Direct to Rift"-Applications.
Not every application is made for this mode. If you download one and the application-folder contains an executable which ends with "_DirectToRift.exe", it is (usually) compatible.
It's very easy to use. What you have to do is to start "..._DirectToRift.exe" and after a few seconds you should see something through your Oculus Rift DK2.
The most applications also show on the main desktop what the user sees on the Oculus Rift DK2. Sometimes there is an option to deactivate this (see readme-files in application-folder), which gets a little more performance.
Extend Desktop to the HMD
When you are activating this display mode, the computer recognizes the Oculus Rift DK2 as second monitor. This is a point, which makes it very complicated.
Best case:
Some applications (like "Don't let go"), which are made with Unity, detect which desktop the Oculus Rift DK2 is and starts there.
Worst case:
Some readme-files of applications tell the user to set the Oculus Rift DK2 to the main screen in Windows' "Screen Resolution"-settings. You'll see, that this brings a few troubles with it e.g. the taskbar and programs are only on Oculus Rift and you're not able to read anything. You can help yourself by looking through the Oculus Rift and closing one eye (now it's readable).
Solutions which sometimes work:
- Set the Oculus Rift DK2 as the left desktop in Windows' "Screen Resolution"-settings.
- Type "MYGAME.exe -adapter 1" in an editor and save it as .bat-file in the application-folder. Replace MYGAME.exe with the executable of the program and find the correct adapter-number.
3rd case:
If your application doesn't detect the Oculus Rift DK2, you can experiment with drag and drop, WINDOWS+LEFT/RIGHT ARROW (put window to the left/right) and ALT+ENTER (Fullscreen) but in most cases you won't get a perfect result (e.g. borders around the application).
Also a big disadvantage is, that the application is only shown on the Oculus Rift DK2 and sometimes spectators also want see to what is displayed on the device. The solution is the Open Broadcaster Software (we used V0.64 beta).
Open Broadcaster Software (Tool we used for mirroring):
You have to do the following steps, to mirror the display of the Oculus Rift DK2:
- Add a Profile by selecting Profiles>New.
- Select Settings>Settings>Advanced and check "Disable encoding while previewing"
- Do a left-click in the listbox "Scenes" and add a new one.
- Add the source "Monitor Capture" by doing a left-click in the listbox "Sources"
- Select the correct ID of the monitor (experiment a little bit)
- Add the source "Game Capture" by doing a left-click in the listbox "Sources" and click "OK". You don't have to change these settings.
Now the tool is ready for mirroring. My recommendation is to activate only one source (Monitor or Game Capture). Click the button "Preview Stream" to show what's going up on your Oculus Rift DK2.
"Game Capture" is when you want to display a fullscreen-application. Start the application you want to show on the Oculus Rift (maybe drag and drop to right desktop and ALT+ENTER for fullscreen), do a left-click on "Game Capture" in Open Broadcaster Software and select "Settings" and choose the fullscreen-program you started. After saving click the button "Preview Stream" for mirroring.
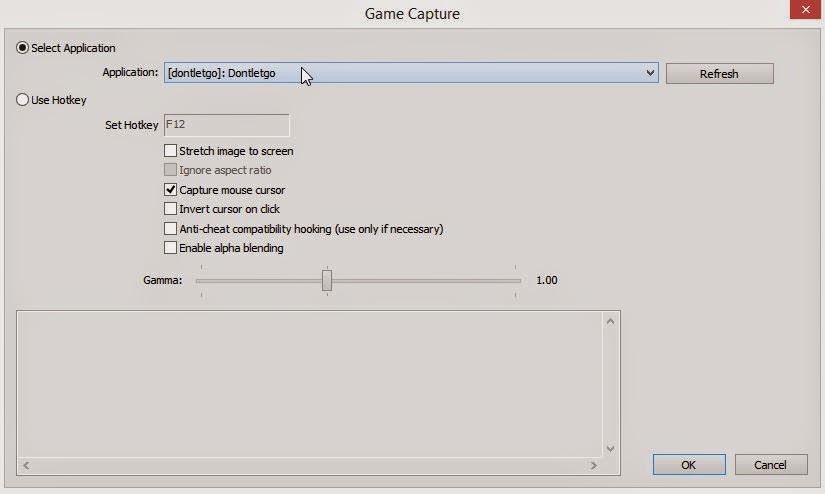 |
| Sample of settings for "Game Caputre" |
 |
| Game Capture |
 |
| Monitor Capture |
In the upcoming post i'm telling about our experiences with the open source tool "Vireio Perception", which makes it possible, to play some "normal" games on the Oculus Rift DK2.
No comments:
Post a Comment